
Creating a Handle for Your Parang

We're back! It's been a long while since we've made a post. That's for a handful of reasons, but mostly due to day job changes and the crazy heat we've had in Texas this summer. But it's cooling down, work is calming down, and we're gettin' back to it!
We've had to damage out a few blades that came in with blemishes, seating into handles crooked, and one with a poorly ground blade. So we thought we'd practice turning lemons into lemonade and throw a new handle on one of those bad boys. We're using a spare Heavy Parang blade.
It's been a great experiment, we had to improvise here and there, and overall it's a pretty rough (we mean "rustic") job well done, but it was fun and a great way to practice.
Here's how it all went down...
The Handle: We found some wood we liked
Mostly, we liked it because it had a nice curve already, and was free. The wood is some kind of Elm. We started with a good sized chunk and used the Farmer's Parang and a baton to shape it. Or a maul, a big stick, whatever you wanna call it. My buddy calls it a Wham-Blam, which I like best. Anyway, take your wham-blam and split off planks and corners until you get to a reasonable size.


After rough shaping, now comes the carving and whittling. I used the Farmer's Parang a bit like a small woodcraft axe since it's heavy enough and the belly of the knife really bites in lets you take chunks off quickly. I've learned a lot of easy and simple techniques from Zed Outdoors' youtube channel that have been super helpful in shaping and working wood for all kinds of little projects.


Once we got a decent roughed out shape, it was off to the garage.
Fitting the Blade to the Handle
You're going to need:
Some way to drill the pilot hole. A drill press or normal hand drill work fine.
A blowtorch. Or a forge if you prefer overkill
Patience & Attention to Detail. At my first job those words showed up in "areas & skills to improve" on my annual reviews for about six years. FYI.
[DISCLAIMER] I forgot to grab pictures of drilling the pilot holes for the handle. This is a simple process for the most part. Find a bit about the width of your blade/tang (I prefer slightly smaller, so in the next step you're really fitting the hole with as few gaps as possible). Make sure your bit will drill as deep as your tang.
I ended up drilling 2 pilot holes right next to each other to fit the tang of the blade.
Now... FIRE


With the tang of your blade red hot from a torch (or forge, if you're fancy), burn the tang down into the pilot hole(s) you've drilled. Repeat as many times as needed to get the blade fully seated flush with the handle. You can see in the third image here I still had about 2mm to go. I got excited once I got it flush and forgot to take another pic. Sorry.
One unique thing about this specific blade: The tip of the tang is kind of swollen/thicker/wider than the rest of it. You can see that in the first image of the three above. After this part of the process I decided I was going to add some sawdust and iron filings to my epoxy just to make sure that extra space in the handle is really filled. You want everything as solid as possible. We'll see over time if I did that right.
Securing the Blade & Handle
Finally, with your handle shaped how you want it, your tang fitted down into it properly, let's assemble the knife/parang. You're going to need:
Epoxy (I use JB Weld) to secure everything
Something for a ferule (I'll get to my... creative improvisation... here in a moment)
Correct drill & bit for piercing Ferule + Handle + Tang of blade
A pin for your ferule to really secure everything mechanically
First, ready your epoxy. The JB Weld I use us 2-part, after mixing I added just a pinch of sawdust and another pinch of iron filings to make it really thick. Using just a stick I scooped up globs of it and stuffed the hole in the handle. I also fully coated the tang itself before inserting it into the handle. You want plenty of epoxy, some should spill out as you get the tang fully seated in the handle... just clean that bit off.
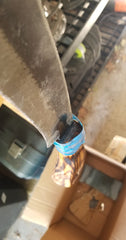
The Ferule. I messed up here. Normally I use a cut off from copper pipe or fitting/coupling. I thought I had one and I didn't, so had to get creative. Inspired by more primitive blades that use thick rawhide wraps to secure and protect their handles, my "ferule" is a strip of aluminum sheeting/flashing. I cut it (wear gloves! Keep your blood where it belongs!) with enough length to go around the handle twice, sanded it down, and then pre-rolled/shaped it into a coil to go around the handle. I then used a bit more epoxy to help secure it. It's ugly but it works. So far so good.
Once that was done, over to the drill press to drill a hole for the pin. You'll notice in earlier pics there's already a hole in my blade. I ignored it and drilled mine about 1/4inch further down the tang. This isn't ideal, but trying to marry up a pre drilled hole with the handle and ferule isn't going to happen. Hopefully that other hole isn't too much of a weak spot for the blade.
After drilling, secure everything with your pin. I'm just using a nail I drove through everything and peened on the other side. You can use metal stock (copper always looks nice and is easy to peen), and lots of places online sell specific decorative stock for this purpose to really add character to your blades. I'm not that fancy. Anyway, here's how mine turned out:

Now we wait 24+ hours for that epoxy to set. If you don't like something, you better fix it now!
Final Touches & the Final Blade
With everything secure and set, you have a functional tool! The following are optional, but I'd always suggest you at least sand and oil your blade for comfort and prolonged life.
You'll need:
Blowtorch (even a butane lighter would work, but not too great)
Sandpaper/Sander
Mineral spirits
Finishing Oil (I use "natural" colored Danish Oil)
Painter's Tape (helps with oiling)
Before doing anything else, I ended up hitting the handle on the sander for a touch up. I had originally wanted a very rustic look and planned on keeping it purely shaped by the parang only, but there were some parts I needed to smooth out.
After that, blowtorch time to burn in just a little character and bring out the grain. I ended up hitting it on the sander again to better shape the handle, which is why the handle in the pre-oiled pic below looks a little fatter. Once you have the shape you want and everything is sanded down to your liking, I wipe it all down with a little bit of mineral spirits first, to remove any oils or other gunk before you oil.
When the handle is completely dry and clean, oil it up with your preferred treatment to protect the wood and really bring out that toasted woodgrain. I wrap painter's tape around the ferule and up some to make a little "well" that I flood with Danish Oil. This lets it sit there and really soak into the wood. It's not necessary, but guarantees you've got maximum absorption at a pretty critical spot.


Wait for your oil to absorb and set, and then you're done! I typically just leave it overnight. If you're in a humid environment, bring it indoors to an air conditioned area. Lower humidity will help the oil set and take.
Go Outside and Have Fun!
That's it! You're done! Is mine perfect? Nope. Is it elegant? Nooooope. Would I try to sell this? LOL No. But I made it, it's mine, and it works great. I'll add a tape or some kind of protective wrap around my improvised sheeting ferule just to be safe. Not sure how likely, but it would definitely be possible to cut yourself on that edge by accident
Make time to make things. It doesn't matter if it's perfect, and most of the time only you can notice the imperfections anyway.
Get creative, do new stuff, build new things, go have fun.
